Field report: integrating Jev into a Genkit agent
By ALEXANDRE DERGHAM · 2026-11-09
Traditional LLMs are great at writing emails, coding features or holding a fluent conversation. But what happens when your agent simply needs to make a binary decision, classify an intent or route a data flow in a fraction of a second? This article tackles that problem by integrating TypeSafe AI's Jev into an agent's structure (in this case, one built with Genkit).
Tags : Jev, Genkit, Gemini
Rethinking AI for machines, not for humans
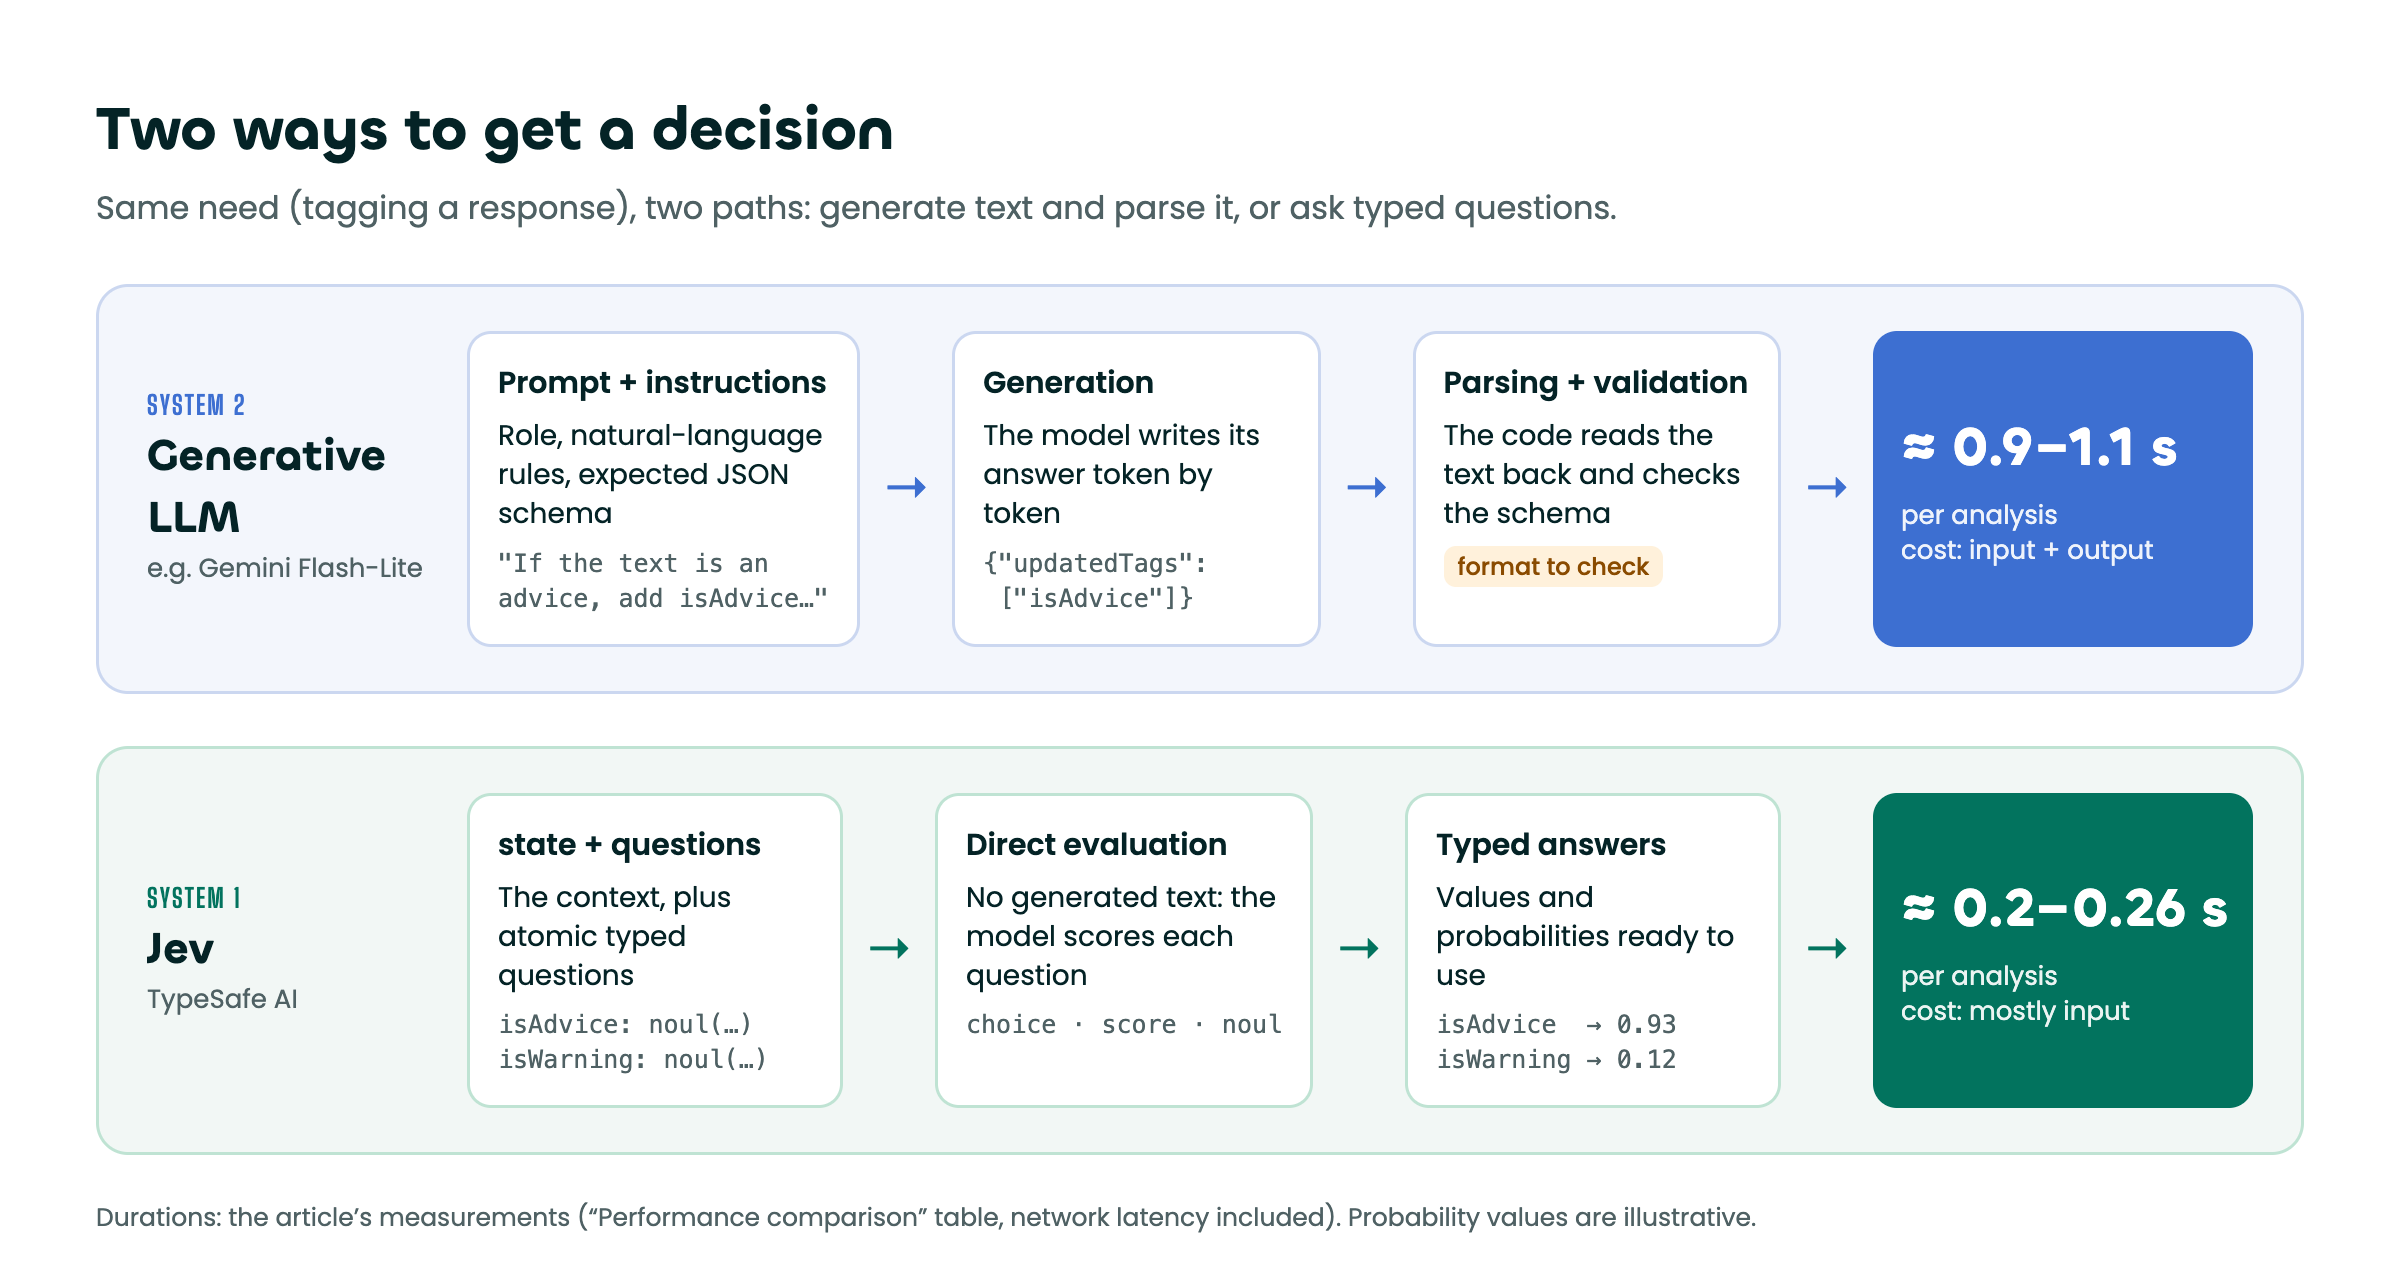
Developers know the problem well: forcing a text-generating model to spit out strict JSON makes the code much heavier, pushes latency to unacceptable levels and needlessly inflates the cloud bill.
This is where Jev (developed by TypeSafe AI) comes in: a System One model designed solely to return typed decisions and probabilities instead of blocks of raw text. In this article, you will see how to integrate it cleanly into a Genkit agent to build a decision system that is robust, ultra-fast and cost-effective.
What is TypeSafe AI's Jev and why is it a game changer?
The "System One" concept
Inspired by Daniel Kahneman's work in cognitive psychology (fast, intuitive thinking versus slow, analytical thinking), Jev is built for instant intuition and targeted judgments.
An interface designed for code
Unlike conventional LLMs, Jev leaves text generation aside:
- Input: a textual or JSON
statedefining the context to evaluate, combined with atomicquestions. - Output: structured data, precise scores and probability distributions.
The three fundamental question types
Jev structures your requests around three essential logical primitives:
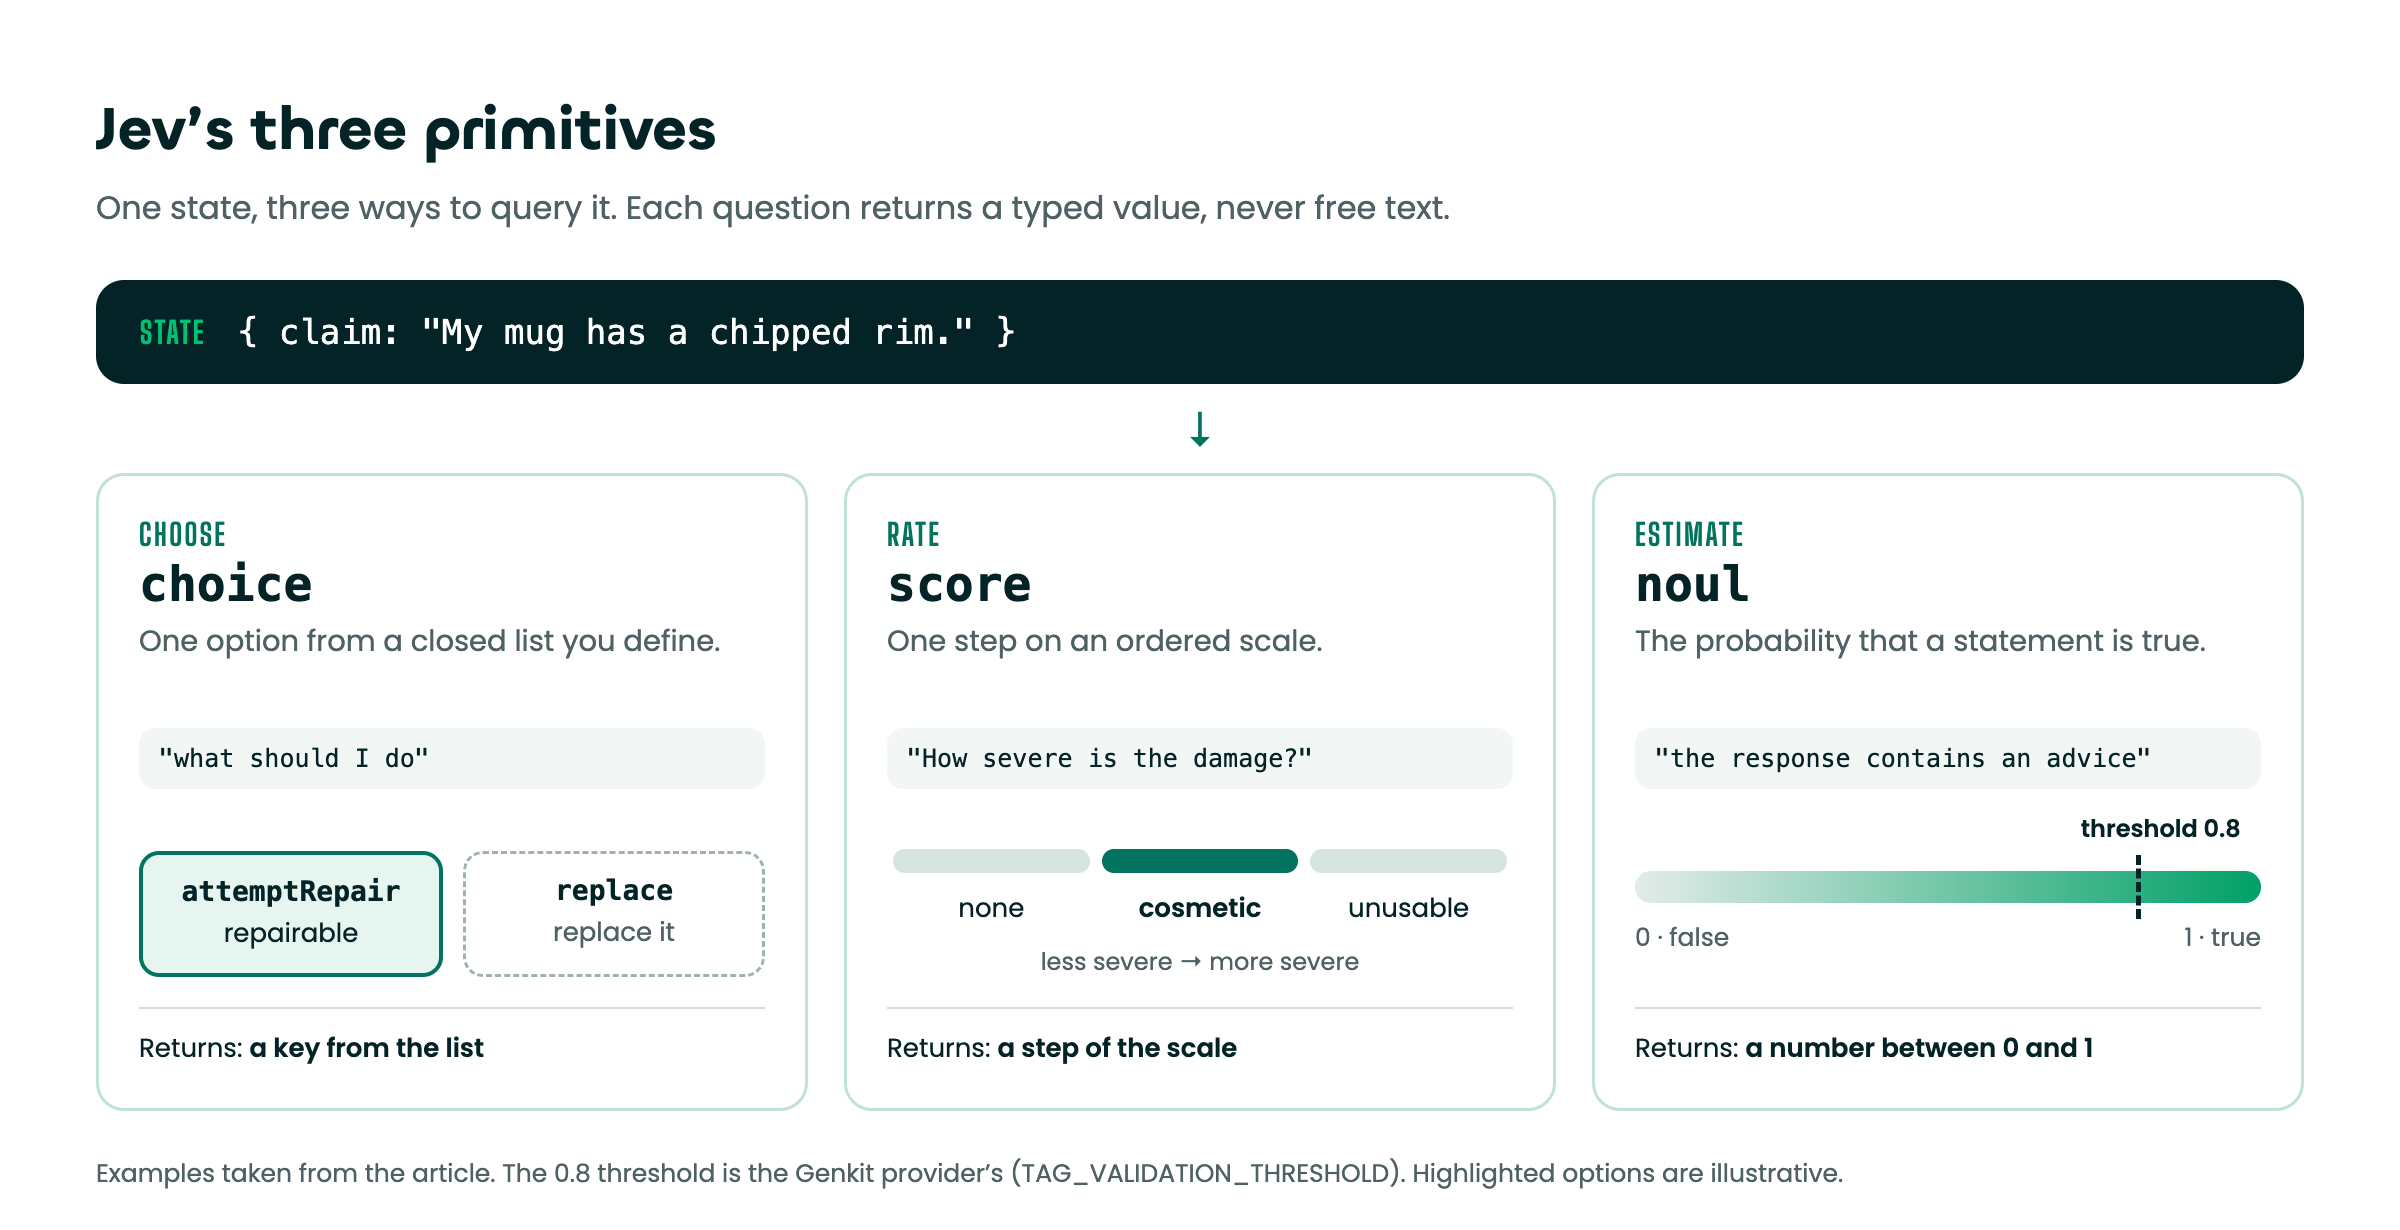
Examples in typescript with @typesafe-ai/sdk:
state: { claim: "My mug has a chipped rim." },
questions: {
  // returns "attemptRepair" or "replace" depending on whether the product can be repaired
  action: choice("what should I do", {
    attemptRepair: "the product can be repaired",
    replace: "the product cannot be repaired"
  }),

  // returns "none", "cosmetic" or "unusable"
  // depending on the damage to the product
  severity: score("How severe is the damage?", [
    "none",
    "cosmetic",
    "unusable"
  ]),

  // returns a number between 0 and 1,
  // 0 means the product is perfectly usable
  // 1 means the product is unusable with 100% certainty
  damaged: noul("Is the product still usable")
},
Key benefits
Thanks to this specialized approach, Jev is 40x to 200x faster and significantly cheaper than frontier LLMs on classification, filtering or routing tasks.
Why pair Genkit with Jev in an agent architecture?
A quick reminder about Genkit
Developed by Firebase, Genkit is the ideal open-source framework for orchestrating AI agents and workflows in a modular, typed and secure way in TypeScript.
Jev's role in an agent loop
In a modern architecture:
- Genkit manages the state, the overall tool orchestration and content generation (through Gemini, for example).
- Jev acts as the agent's instant decision and routing engine (e.g. classifying a user's intent, validating a business rule on the fly, or routing a support ticket).
The running example
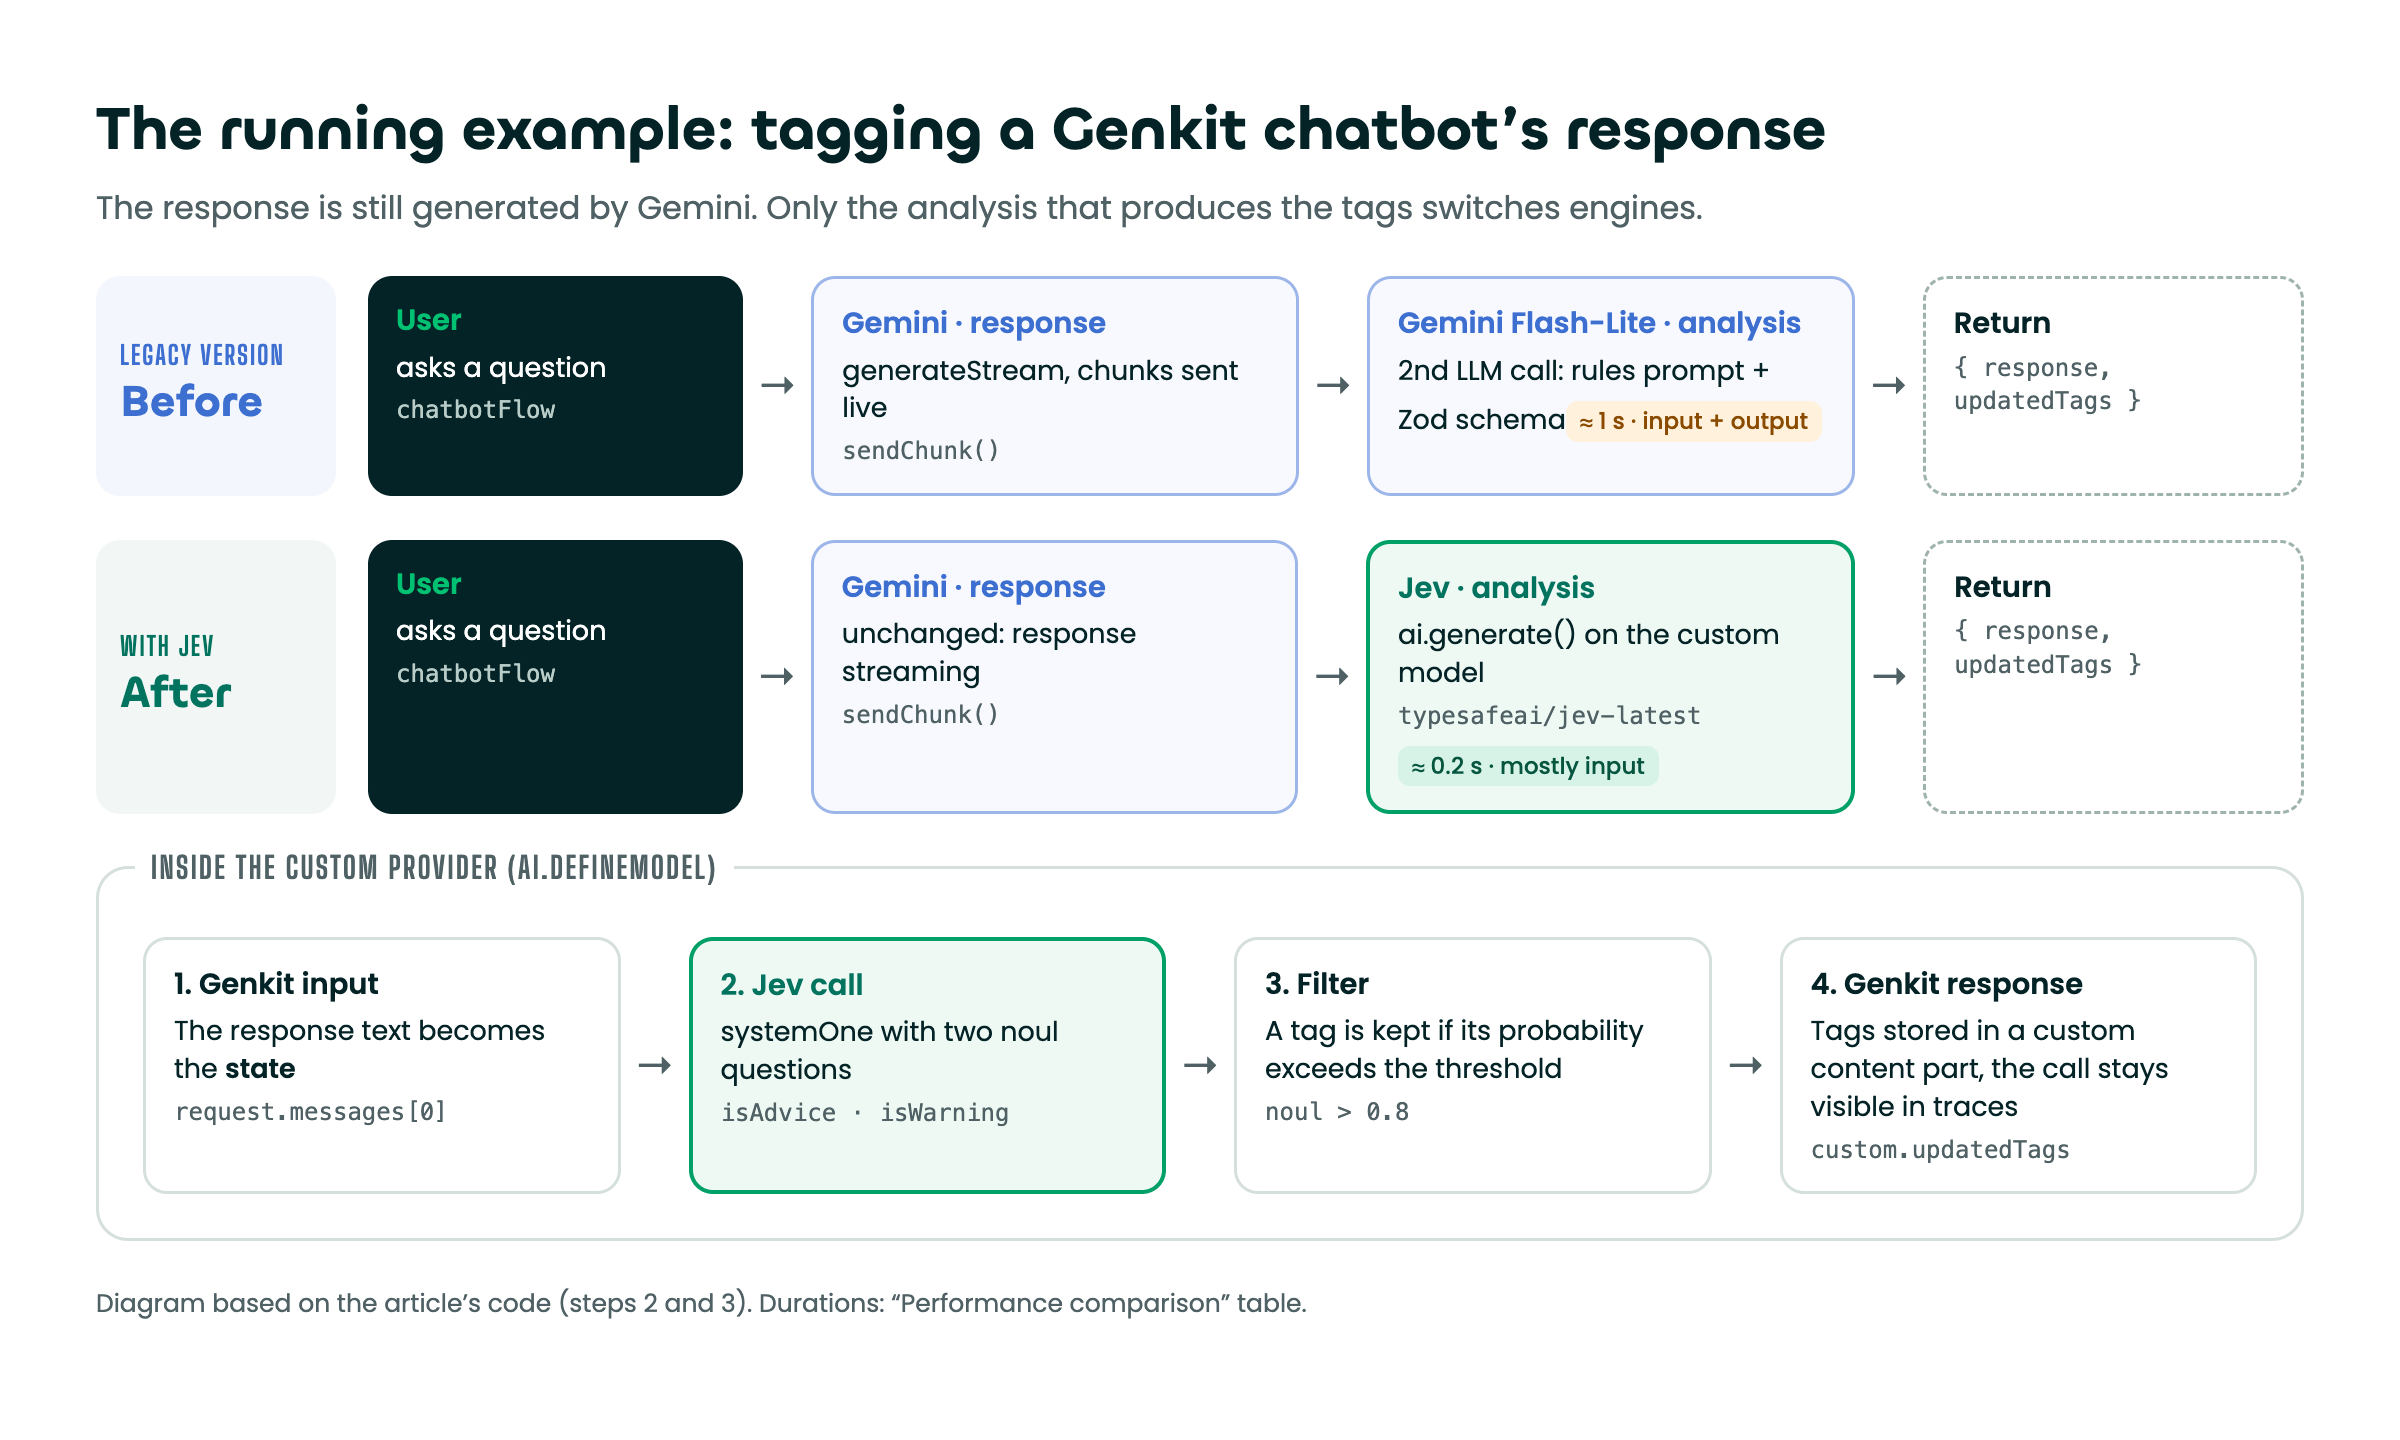
Let's take a Genkit-based chatbot agent: the text response is generated by a standard LLM. We need to extend this agent so that an analysis of the chat response gives us a list of category tags.
In the legacy version of this chatbot, we use a prompt generated by the following function to decide which tags to keep:
export const generateTagsAnalyserPrompt =
  (chatBotResponse: string): GenerateOptions => ({
      model: 'googleai/gemini-3.5-flash-lite',
      prompt: `You are a text analyser.
        You have to check if the following text matches the following conditions
          - If the text is an advice then add "isAdvice" to the list of updated tags.
          - If the text contains a warning then add "isWarning" to the list of updated tags.
        The text to analyse is "${chatBotResponse}"`,
      config: {
        temperature: 0.2,
        topK: 20,
        topP: 0.90
      },
      output: {
        schema: z.object({
          updatedTags: z.array(z.string())
        })
      }
    });
In the version we are about to write, Jev will analyze the response and return the list of tags.
Step-by-step tutorial: integrating Jev into a Genkit agent
Step 1: Setup and configuration
Start by installing the required dependencies in your Node.js/TypeScript project, then set up your API key from the TypeSafe AI console:
npm install @typesafe-ai/sdk
export TYPESAFE_API_KEY="your_api_key"
Step 2: Creating a custom Genkit provider
At the time of writing, there is no Genkit plugin that makes it easy to integrate Jev in TypeScript, so we will write the provider ourselves and present it as an LLM model.
Note that this step is not required to call the TypeSafe AI API. It simply integrates the call into the framework so that it shows up in Genkit's monitoring and debugging tools.
import { googleAI } from '@genkit-ai/google-genai';
import { noul, TypeSafeClient } from '@typesafe-ai/sdk';
import { GenerationCommonConfigSchema, genkit, z } from 'genkit';

const ai = genkit({
  plugins: [
    googleAI()
  ]
});

const typeSafeClient = new TypeSafeClient({ defaultModel: 'jev-latest' });
const TAG_VALIDATION_THRESHOLD = 0.8;

// Custom model definition
const typesafeAIModel = ai.defineModel(
  {
    name: 'typesafeai/jev-latest',
    configSchema: GenerationCommonConfigSchema,
    supports: {
      tools: false,
      systemRole: true
    }
  },
  async (request) => {
    const response = await typeSafeClient.systemOne({
      state: request.messages[0].content[0].text ?? '',
      questions: {
        isAdvice: noul('the response contains an advice'),
        isWarning: noul('the response contains a warning')
      }
    });

    const updatedTags = ['isAdvice', 'isWarning'].filter((tag) => {
      const answer = response.answers[tag];
      return answer.type === 'noul' && answer.noul > TAG_VALIDATION_THRESHOLD;
    });

    // response format Genkit expects in order to wrap the call
    return {
      message: {
        role: 'model' as const,
        content: [{ text: '', custom: { updatedTags } }]
      }
    };
  }
 );
Step 3: Implementing the Genkit Flow
Here is how to structure a Genkit Flow in TypeScript that combines classic text generation with Jev's ultra-fast evaluation:
import { GenerationCommonConfigSchema, genkit, z } from 'genkit';
import { googleAI } from '@genkit-ai/google-genai';

export const generateResponseFlow = ai.defineFlow({
  name: 'chatbotFlow',
  inputSchema: /* Input schema */,
  outputSchema: z.object({
    response: z.string(),
    updatedTags: z.array(z.string())
  }),
  streamSchema: z.string()
}, async (subject: ChatSubject, { sendChunk }): Promise<ChatResponse> => {
  const prompt = subject.prompt;

  // Streaming call to the main chatbot agent
  // generateChatPrompt builds the prompt and is not detailed here.
  const { response, stream } = ai.generateStream(generateChatPrompt(subject));

  for await (const chunk of stream) {
    sendChunk(chunk.text);
  }

  const chatResponse = (await response).text;

  // Call to the wrapped Jev model
  let updatedTags = [];
  const jevResponse = await ai.generate({
    prompt: { text: chatResponse },
    model: typesafeAIModel
  });
  updatedTags = jevResponse.message?.content[0]?.custom?.updatedTags;

  return {
    response: chatResponse,
    updatedTags
  };
});
Other possible use cases
Jev works so simply that it can be applied to many use cases:
- Enforcing guardrails by validating an agent's output (e.g. no sensitive data in the response).
- Categorizing and sorting an incoming message so that the right agent or process handles it.
- Evaluating a message against a simple criterion (e.g. how urgent a ticket is, or a customer's churn risk).
Note that Jev's reliability still depends on how simple the input prompt is. Since Jev cannot break down and spell out a line of reasoning, the best practice is to define choices that are as simple and atomic as possible.
An alternative: Kev
Kev is an alternative to Jev that follows the same "System One" approach.
This Qwen-based solution can be deployed and run locally, with performance that remains attractive compared with a conventional LLM approach as long as the input stays small.
Worth noting: the @typesafe-ai/sdk library makes it very easy for the Genkit agent to call Kev, since the only change needed is in how the typeSafeClient is initialized.
const typeSafeClient = new TypeSafeClient({
    defaultModel: 'kev-latest',
    apiKey: 'local',
    baseURL: 'http://localhost:8009'
  });
Performance comparison
Using two datasets of different sizes, we compared the duration and cost of the analysis step (network latency included).
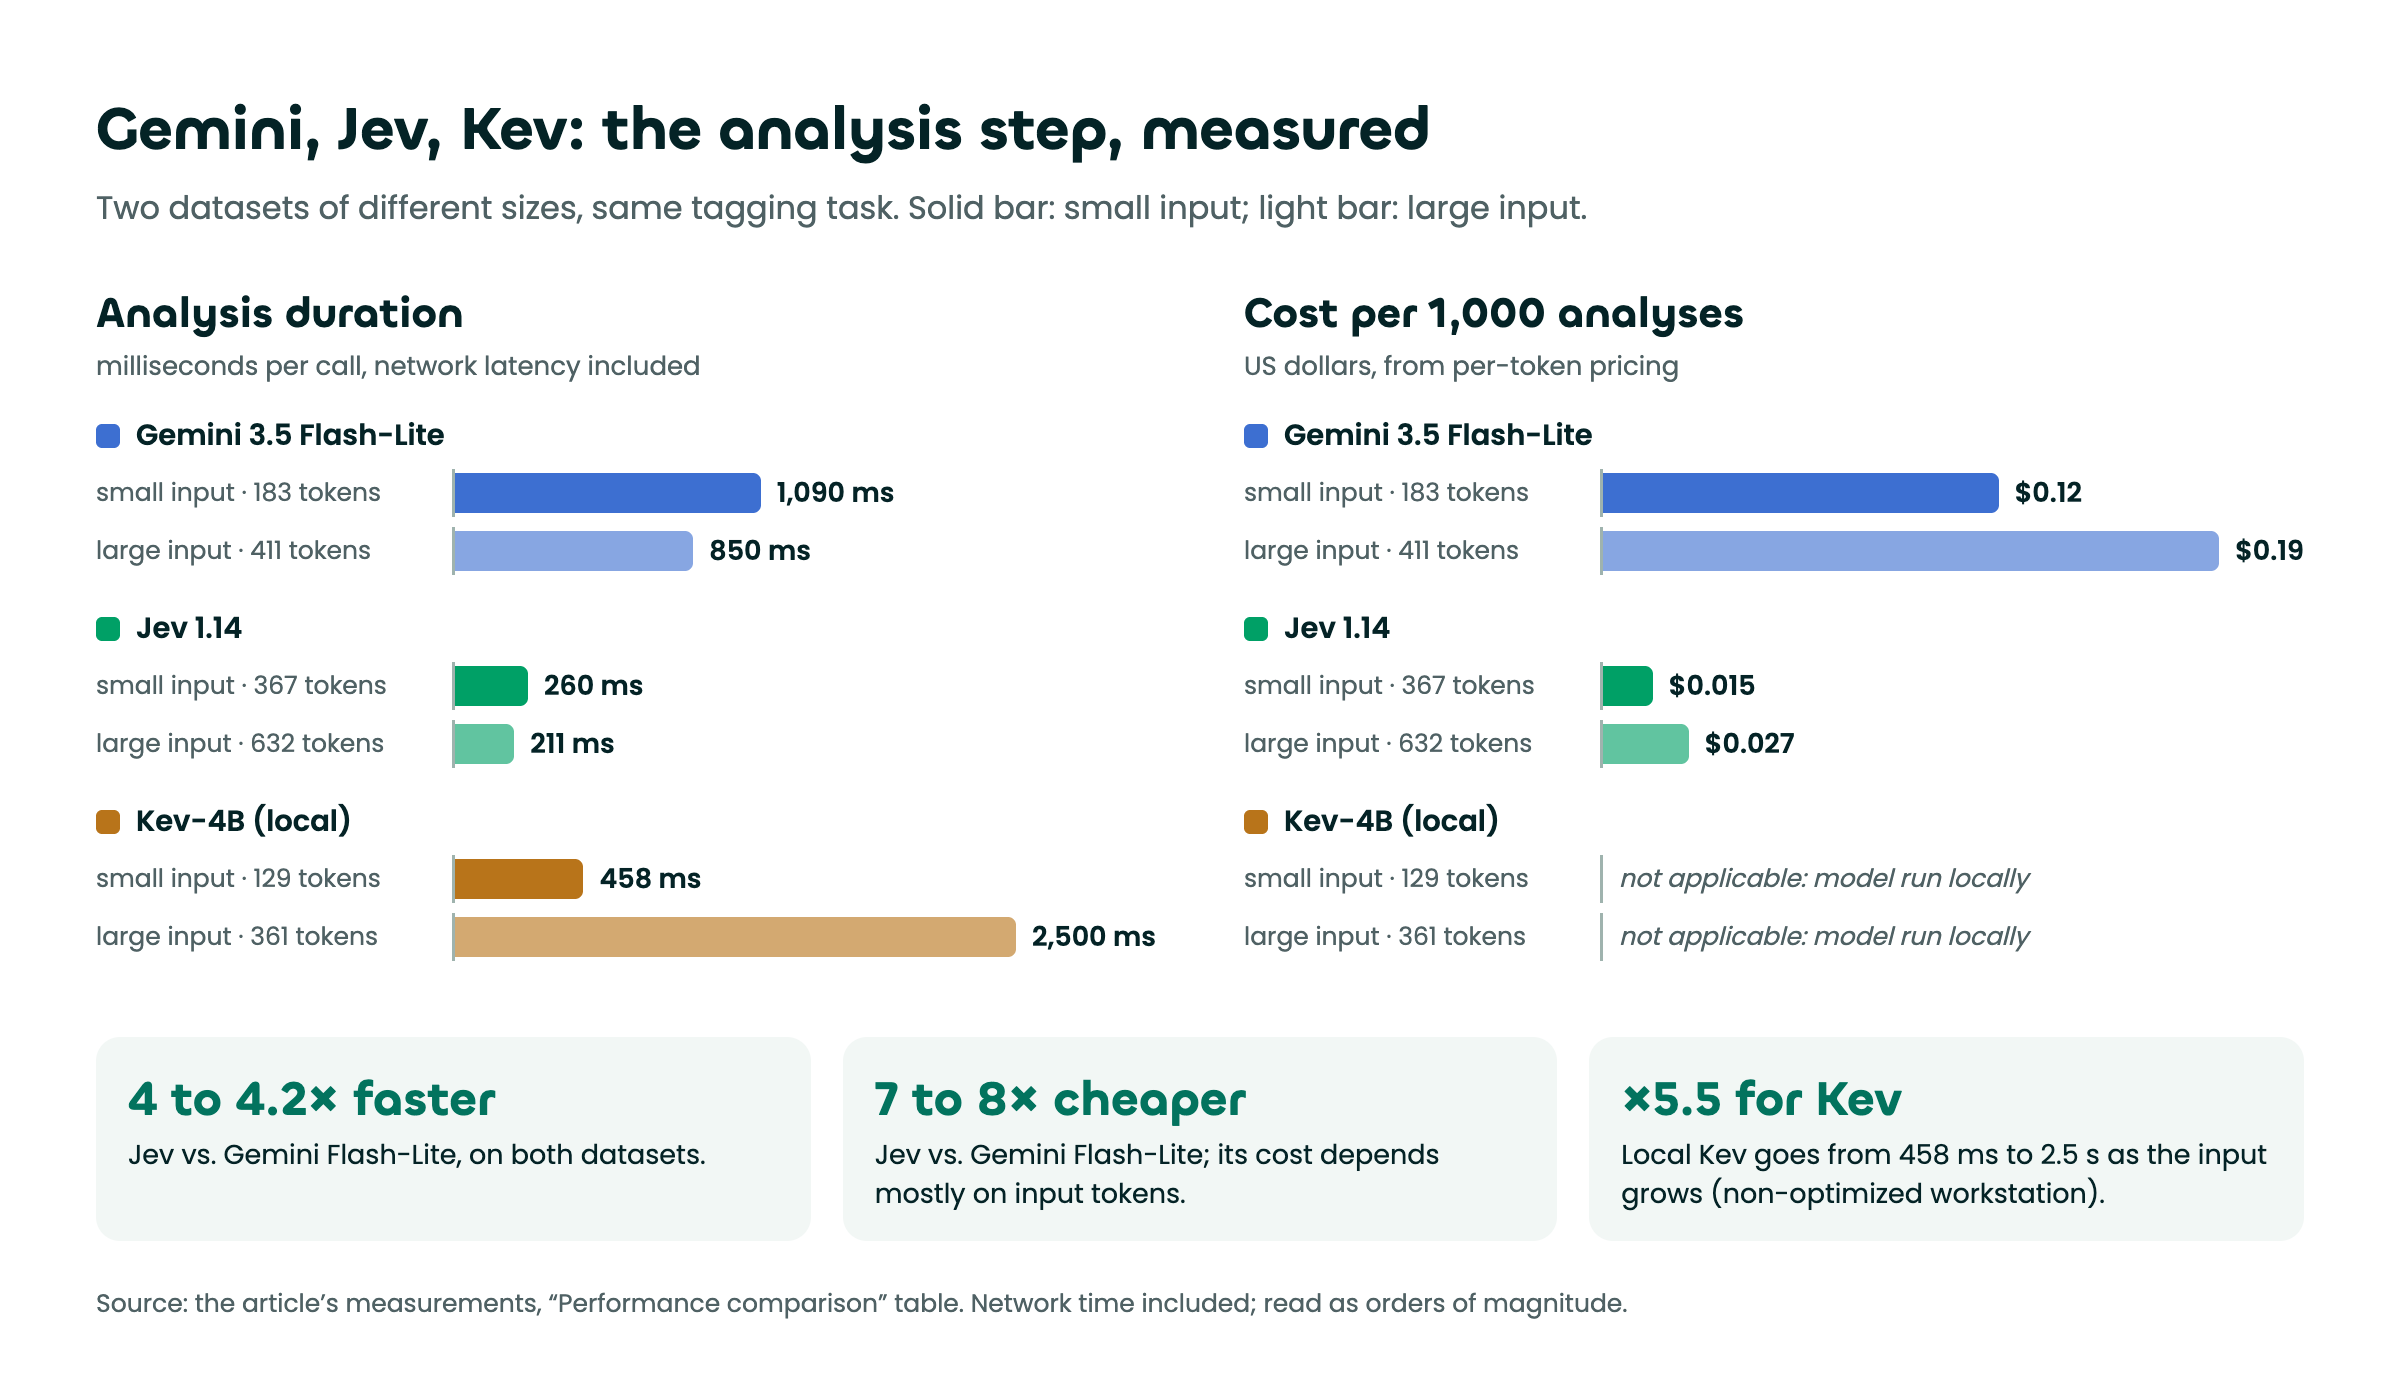
In short, we can observe that:
- Gemini's and Jev's processing times stay stable even as the input grows.
- Kev's performance collapses as the input grows. This observation should be taken with caution, since the model is hosted locally on a workstation that may not be optimized for this kind of workload.
- Jev remains faster and cheaper than Gemini.
Note that, unlike LLM-type models, most of Jev's running cost depends only on the number of input tokens.
Conclusion
By combining Genkit's orchestration flexibility with the surgical, instant power of Jev (TypeSafe AI), you remove the bottlenecks that text generation creates in routing. Your agents become not only faster and cheaper but also more reliable, since Jev is deterministic by nature.
Ready to try the System One approach in your next Genkit application? Share your feedback in the comments!
Further reading
- the official TypeSafe AI website
- the TypeSafe AI console
- the official Genkit website
- a self-hostable alternative to Jev: Kev