Field report on Genkit
By ALEXANDRE DERGHAM · 2026-11-09
Building complex GenAI applications means orchestrating agents, RAG and external tools while keeping strong observability. To meet this architecture challenge, I chose Genkit (Firebase/Google). In this article, I share my experience of building a complete chatbot. See how its code-first approach (TypeScript/Zod), its typed flows and its Genkit UI make it easier to design, debug and benchmark robust AI applications.
Tags : Genkit, Firebase, Firestore, RAG
Integrating generative AI into complex applications has quickly become a software architecture challenge. Beyond a simple call to a large language model (LLM) API, running real-world GenAI applications means coordinating several agents, injecting context through document retrieval (RAG), connecting to third-party systems through tools, and meeting a fundamental need for observability.
To address these challenges, I chose Genkit (developed by the Firebase / Google team). In this article, I share my experience of building and deploying a robust GenAI architecture with this framework.
Why Genkit
Early on, I kept running into the same limits with purely custom approaches or with other libraries on the market:
- No strong typing: passing structured data between several steps of a processing chain without input/output validation quickly leads to silent bugs.
- Hard-to-achieve observability: without proper tracing tools, understanding why an agent drifted or which tool failed in a chain of 5 LLM calls soon feels like looking for a needle in a haystack.
- Scattered tooling: handling RAG, evaluation and orchestration separately made the project hard to maintain.
Genkit won me over with its code-first philosophy, its strict typing based on TypeScript and Zod, and its built-in development interface (Genkit Developer UI).
The need and the structure of our agent
The functional need
The Genkit application described in this article is a chatbot that must answer the user by:
- adopting the attitude of a persona;
- streaming its answer, for the user's comfort;
- giving correct, precise and consistent answers based on an external data source;
- categorizing the answer it produces.
As input, the client application sends the user's prompt along with a configuration that includes:
- the chatbot's persona;
- the category tags to check, each with the question used to verify it.
The agent's structure
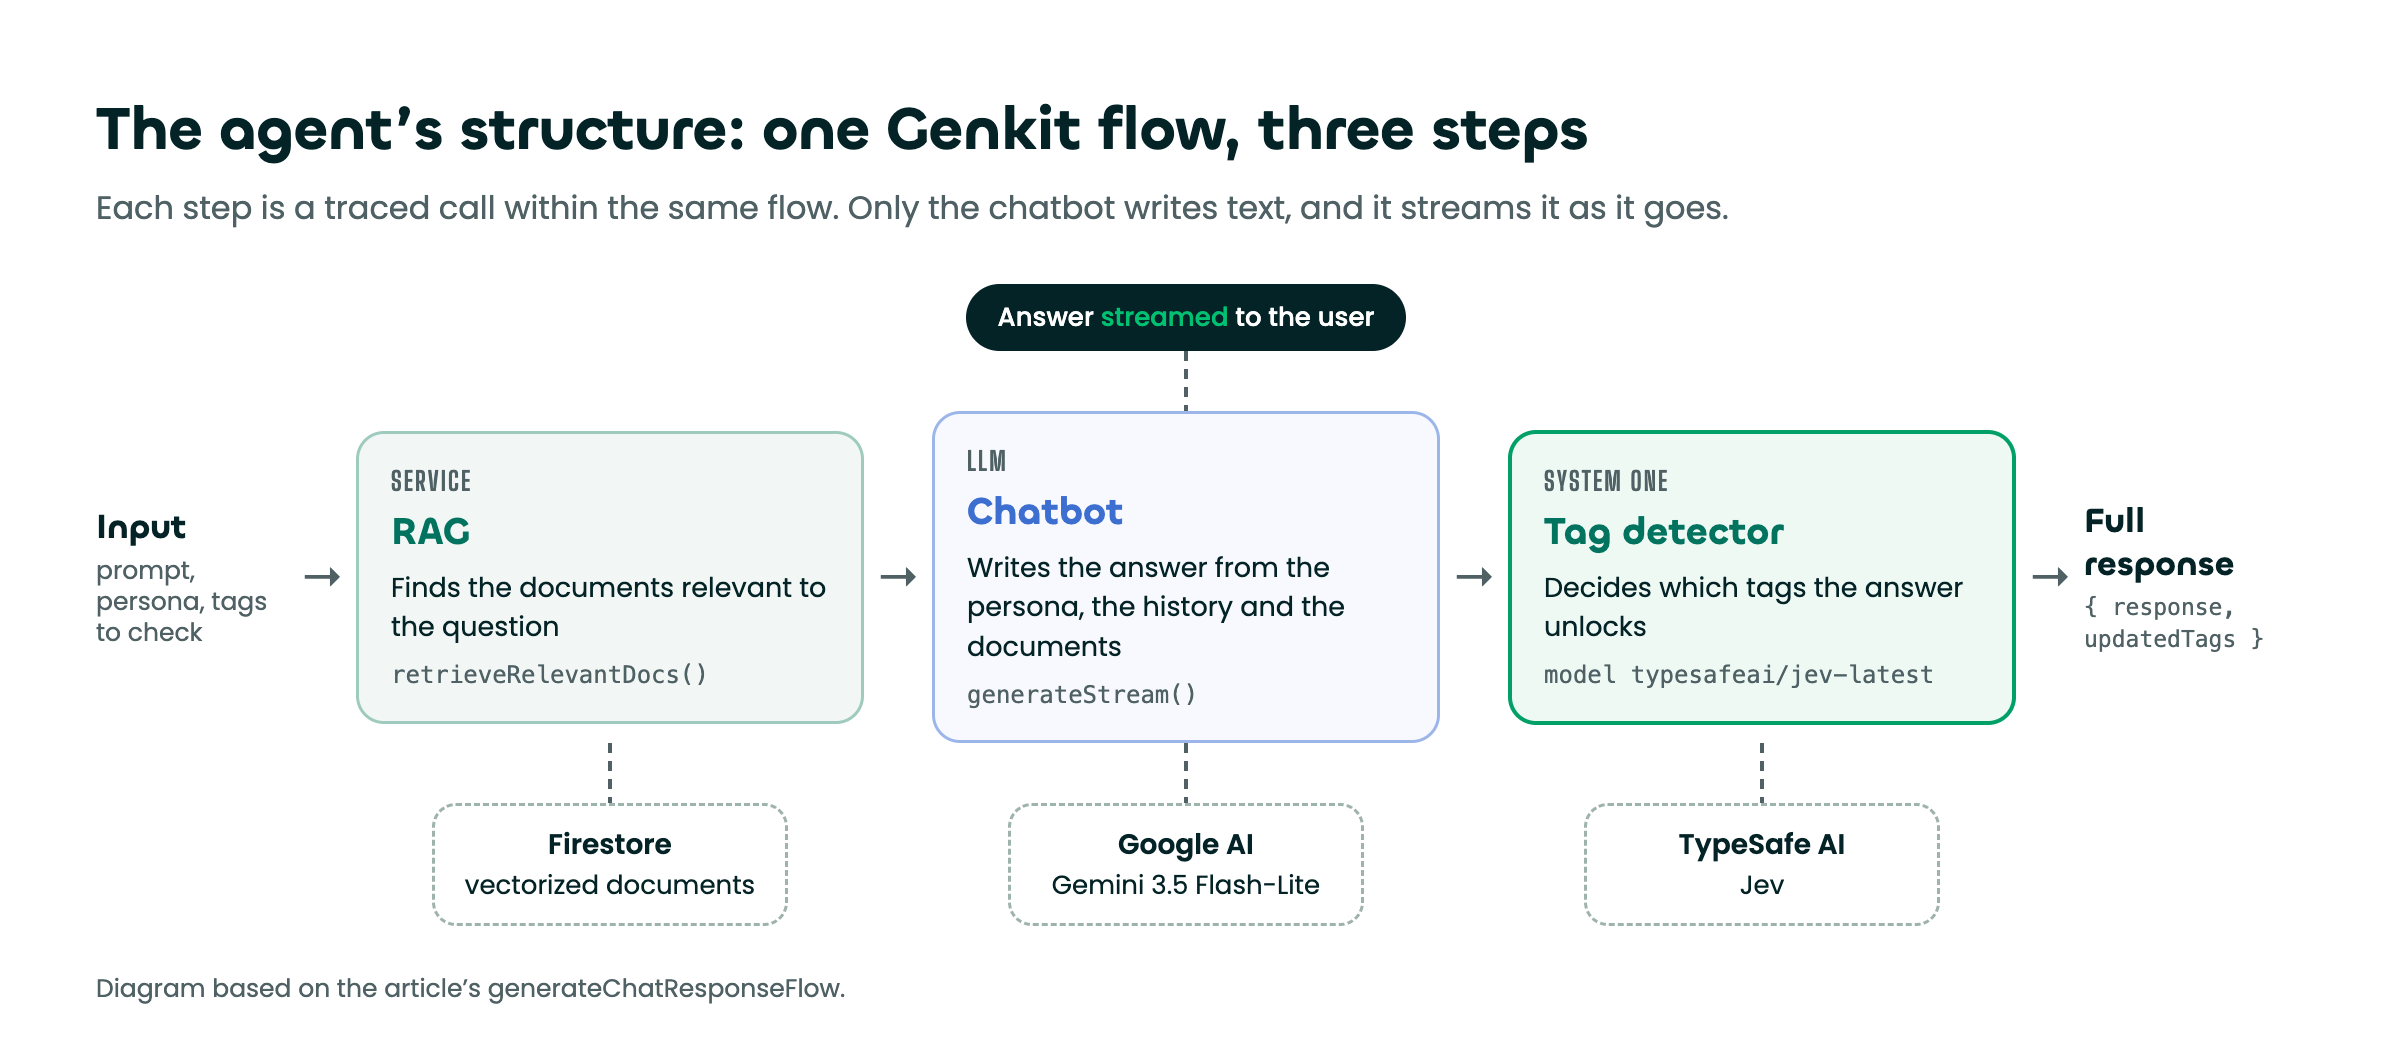
Defining and orchestrating a multi-agent flow
The operational core of our application is Genkit's notion of a Flow. A flow is a strongly typed function that implements the business logic, manages state and orchestrates the different agents.
Before writing the flow, let's define the different agents in our system.
The chatbot agent
import { GenerateOptions } from '@genkit-ai/ai';
import { MessageData, Part } from 'genkit';
import { ChatConfig, ChatSubject } from '../model/chat-subject';

type Message = (MessageData & {
  content: Part[] | string | (string | Part)[];
});

export const generateChatPrompt = (
  // the input sent by the client application
  { prompt, config, chatLog }: ChatSubject,

  // the documents selected by RAG to complete the context
  docContext: string[] = []
): GenerateOptions => {
  const baseMessages: Message[] = [
    {
      role: 'user',
      // builds the prompt from the persona config
      // and the documents returned by RAG
      content: [{ text: generateChatSystemPrompt(config, docContext) }]
    },
    {
      role: 'model',
      content: [{ text: config.initText }] // e.g. Hello! how can I help you?
    }
  ];

  const chatLogAsMessages: Message[] = chatLog.map(({ text, author }) => ({
    role: author === 'model' ? 'model' : 'user',
    content: [{ text }]
  }));

  return {
    model: 'googleai/gemini-3.5-flash-lite',
    prompt,
    config: {
      temperature: 0.4,
      topP: 0.95
    },
    // the prompt is processed together with the conversation history.
    messages: baseMessages.concat(chatLogAsMessages)
  };
};
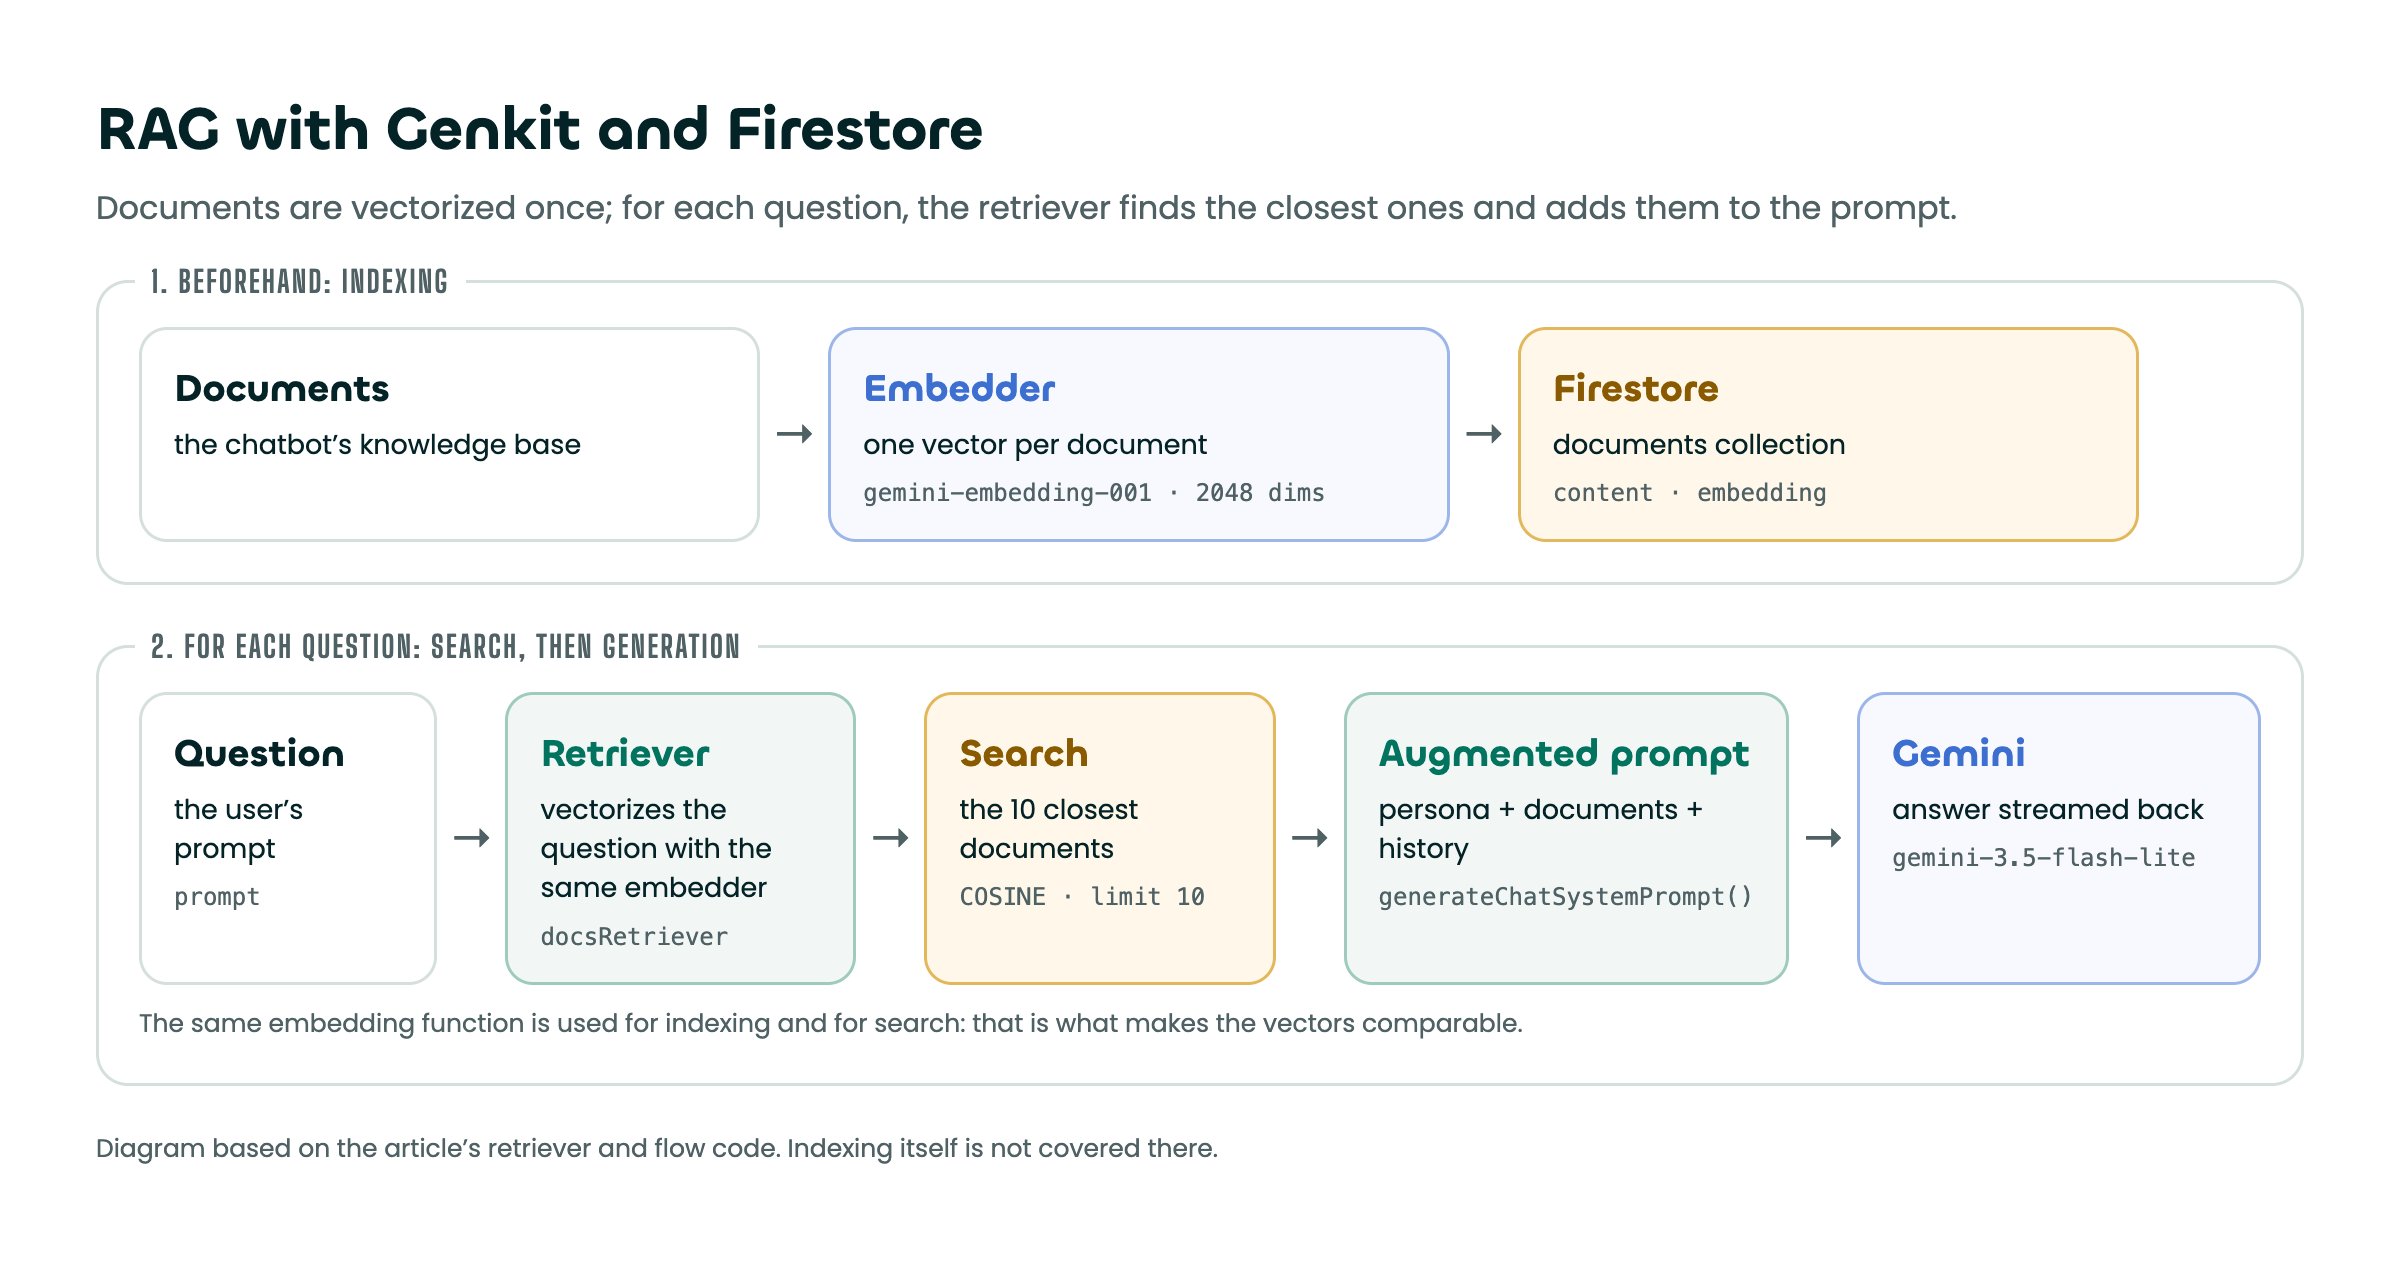
RAG (Retrieval-Augmented Generation)
To improve the prompt, we can draw on existing data stored in Firestore and vectorized (or "embedded") beforehand.
To do so, we define a retriever, which handles the vector similarity search.
import { getApps, initializeApp } from 'firebase-admin/app';
import { defineFirestoreRetriever } from '@genkit-ai/firebase';
import { getFirestore, Firestore } from 'firebase-admin/firestore';
import { Genkit } from 'genkit';
import { googleAI } from '@genkit-ai/google-genai';

export const retrieveRelevantDocs = async (
  ai: Genkit,
  prompt: string
): Promise<string[]> => {

  if (!prompt || prompt.length === 0) {
    return [];
  }

  try {
    const db = getFirestoreDb(); // initializes firebase-admin once (not shown here)

    const retriever = defineFirestoreRetriever(ai, {
      name: 'docsRetriever',
      firestore: db,
      collection: 'documents',
      contentField: 'content',
      vectorField: 'embedding',
      embedder: googleAI.embedder(
        'gemini-embedding-001',
        { outputDimensionality: 2048 }
      ),
      distanceMeasure: 'COSINE',
    });

    const docs = await ai.retrieve({
      retriever,
      query: prompt,
      options: { limit: 10 }
    });

    return docs.flatMap((d) => d.content)
      .map((c) => c.text)
      .filter((t) => t !== undefined);
  } catch (error) {
    console.error('Error retrieving relevant documents:', error);
    return [];
  }
};
Coordinating and integrating a SystemOne agent (Jev)
In this pipeline, not every agent is handled natively by the same model or the same infrastructure. For example, the specialized SystemOne (Jev) agent, which adds the category tags, has to be declared as a custom model, since there is no plugin to integrate it.
This part is covered in detail in the article dedicated to integrating Jev into a Genkit agent.
The flow
import { googleAI } from '@genkit-ai/google-genai';
import { GenerationCommonConfigSchema, genkit, z } from 'genkit';
import { ChatResponse } from '../model/chat-response';
import { DEFAULT_CHAT_SUBJECT, ChatSubject } from '../model/chat-subject';
import { generateChatPrompt } from '../prompts/chat.prompt';
import { retrieveRelevantDocs } from '../service/doc-retriever.service';
import {
  generateChatResponseUnlockableTagsAnalyserPrompt,
  requestForUnlockableTags
} from '../service/response-analyser.service';

const ai = genkit({
  plugins: [
    googleAI()
  ]
});

// Custom model definition
const typesafeAIModel = ai.defineModel(
  {
    name: 'typesafeai/jev-latest',
    configSchema: GenerationCommonConfigSchema,
    supports: {
      tools: false,
      systemRole: true
    }
  },
  async (request) => {
    return requestForUnlockableTags(request);
  }
);

export const generateChatResponseFlow = ai.defineFlow({
  name: 'generateChatPrompt',
  inputSchema: z.any()
    .describe('A prompt with its configuration')
    .default(DEFAULT_CHAT_SUBJECT),
  outputSchema: z.object({
    response: z.string(),
    updatedTags: z.array(z.string())
  }),
  streamSchema: z.string()
}, async (subject: ChatSubject, { sendChunk }): Promise<ChatResponse> => {
  let relevantDocs: string[] = [];

  const prompt = subject.prompt;

  if (prompt && prompt.trim().length > 0) {
    try {
      // fetch the relevant text to augment the generation
      relevantDocs = await retrieveRelevantDocs(ai, prompt);
    } catch (retrievalError) {
      console.warn(
        'Could not compute prompt embedding or retrieve documents:',
        retrievalError
      );
    }
  }

  const chatPrompt = generateChatPrompt(subject, relevantDocs);
  const { response, stream } = ai.generateStream(chatPrompt);

  for await (const chunk of stream) {
    sendChunk(chunk.text);
  }

  const chatResponse = (await response).text;

  const unlockableTags = subject.config.unlockableTags ?? [];
  let updatedTags: string[] = [];
  if (unlockableTags.length > 0) {
    const jevResponse = await ai.generate({
      ...generateChatResponseUnlockableTagsAnalyserPrompt(chatResponse, unlockableTags),
      model: typesafeAIModel
    });
    updatedTags = jevResponse.message?.content[0]?.custom?.updatedTags ?? [];
  }
  return {
    response: chatResponse,
    updatedTags
  };
});
Extending capabilities: defining custom tools
Language models become far more valuable once they can act on their environment. In Genkit, defining a tool (for function calling) is native and fully typed thanks to Zod.
import { z } from 'genkit';

// ai: the genkit() instance declared with the flow
export const fetchCustomerData = ai.defineTool(
  {
    name: 'fetchCustomerData',
    description: 'Fetches a customer\'s details from their ID.',
    inputSchema: z.object({ customerId: z.string() }),
    outputSchema: z.object({ name: z.string(), status: z.string() }),
  },
  async (input) => {
    // Internal API call or database query
    return await db.customers.find(input.customerId);
  }
);
When these tools are passed to the model through the tools option of generate(), the agent decides on its own when to run a tool and with which parameters, while the input arguments are strictly validated before any code runs.
You can of course consume an existing MCP server, and even build and deploy your own.
Developer experience: traces and benchmarks
One of the strongest arguments for Genkit is the development tooling it ships out of the box through the Genkit UI.
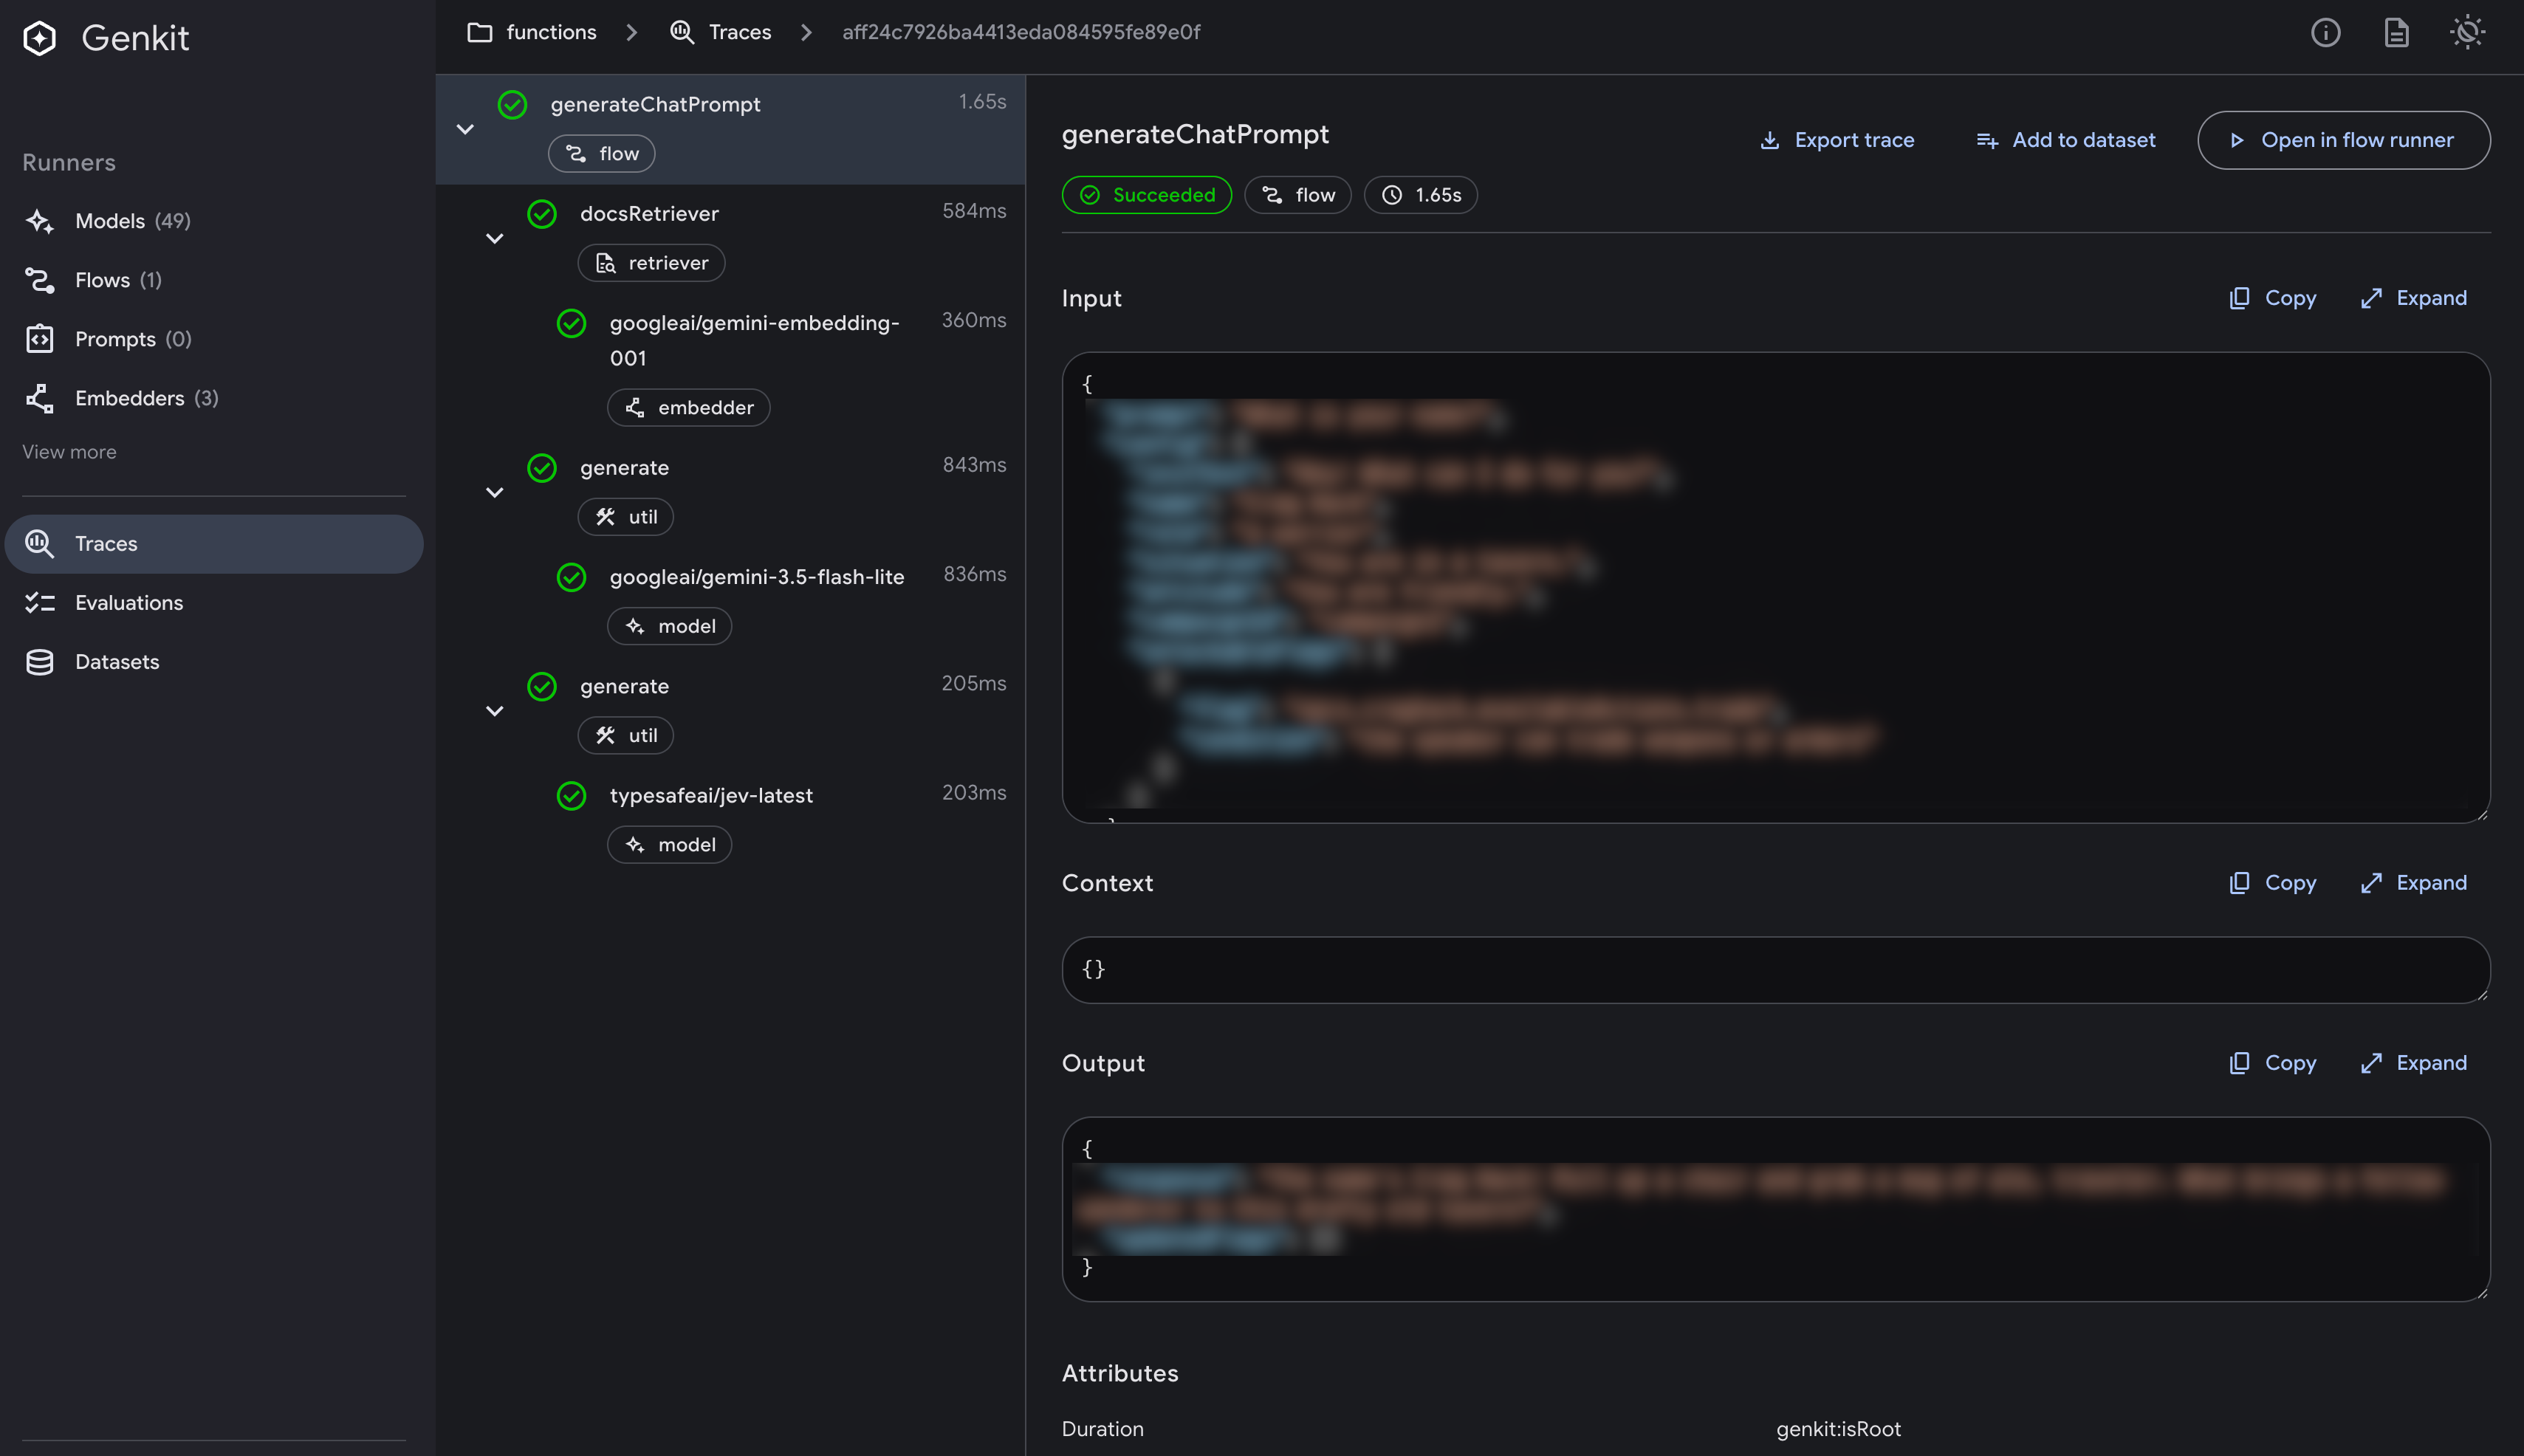
Seeing the invisible with the "Traces" tab
When you run the application through the Genkit CLI (for example npx genkit start -- npx tsx --watch src/index.ts), you get a local interface that shows the full execution of a flow in real time:
- Execution graph: the hierarchy between the main flow, the sub-agents (including SystemOne / Jev), the RAG queries and the tool calls.
- Payload inspection: the prompts sent to the LLMs, the raw responses, the number of tokens consumed and the latency of each step, all readable directly.
- Fine-grained debugging: you immediately spot a tool that returned an error or a prompt that was misinterpreted.
Benchmarking and evaluating without guesswork
Rather than judging the quality of our agents by gut feeling, we can rely on Genkit's benchmarking and evaluation features.
- Evaluation datasets: create test cases with inputs and expected outputs.
- Running evaluators: use built-in evaluators (faithfulness to the context, relevance, hallucination detection).
- Comparing models: run the same flow while changing the underlying model (for example Gemini Pro vs Gemini Flash).
This methodical approach lets you weigh cost, response time and generation quality objectively before deploying the agent.
Takeaways and outlook: our view of Genkit
What we liked
- Typing and reliability: the TypeScript + Zod combination removes a whole class of bugs and guarantees the output format of the agents.
- Observability: the Traces tab of the Genkit UI saves a great deal of time when debugging and fine-tuning prompts.
- A consistent, complete ecosystem: RAG, tools, MCP, flows and evaluation in a single, uniform architecture. Genkit has plugins for the main models on the market (Anthropic, OpenAI, etc.) and for external data sources (Neo4j, Firestore, etc.).
Points to watch
- A fast-moving ecosystem: the framework changes quickly, so keep a regular eye on API and plugin updates.
- The new agents API: worth watching in particular, the new API for defining agents (still in beta at the time of writing) offers a more modern way to write them.
Conclusion
Genkit proved to be an interesting tool for designing and deploying robust multi-agent workflows in an intuitive, consistent way, especially in a Google Firebase environment.
We recommend it if you are looking for a backend-oriented framework to write agents in TypeScript, Go, Dart or Python (coming soon), with tooling that makes testing and debugging easy.
The framework is actively maintained, it keeps evolving and its ecosystem keeps growing.
Further reading
- the official Genkit website
- the Gemini API documentation (Google AI Studio)
- the TypeSafe AI documentation
- the article detailing the Jev integration